Description
This konbini-style onigiri is wrapped just like the ones you’ll find in Japanese convenience stores, with a clever method that keeps the seaweed crisp until the moment you’re ready to eat.
Perfect for meal prep, lunchboxes, or a grab-and-go snack, it’s a fun and practical way to enjoy homemade onigiri anytime.
Ingredients
Units
Scale
For the Onigiri:
- 1-2 sheets of sushi-sized seaweed (nori)
- 1 cup rice (must be Japanese short-grain or medium grain rice because it is sticky), cooked
- 1/2 tsp salt
Fillings Ideas
*Each is enough for one single onigiri:
- 1 tablespoon tuna + 1 tablespoon Japanese goma dressing, mixed
- 1 tablespoon salmon + 1 teaspoon cream cheese + 1/2 tablespoon Kewpie, mixed
- 1 tablespoon pickled vegetables/fruits: Umeboshi, Kimchi, Takuan, etc.
What You’ll Need:
- Tin foil (cut to about 2.5x the length of your nori sheet that's been cut in half - see instructions for further details)
- Tape
Instructions
- Begin by seasoning your rice with the salt.
- Cut a sheet of plastic wrap, about 8 inches x 8 inches.
- Place a small handful of rice (about 1/3 of the rice) in the center of the plastic wrap, spreading it out in a thin layer. Be careful not to smush the rice down!
- Place your fillings directly on top of the rice in the center, leaving some rice on the bottom, top, and sides.
- Grab the left and right sides of the plastic wrap over the onigiri, wrapping it snugly.
- Cup one hand in an L-shape (this forms the base of the triangle). Use your other hand to press the top into a point while gently squeezing the sides with your L-shaped hand.
- Rotate and repeat the light pressing motion until you get a firm, compact triangle. Don’t squeeze too hard: You want the rice to hold its shape but not be smashed – it should still have a bit of fluffiness.
- Fold your nori sheet in half hamburger-style (short edge to short edge) and set it aside.
- Place a sheet of aluminum foil vertically in front of you (long sides up and down). The foil should be about 2.5 times the length of your nori. Center the folded nori on the foil, shiny side down (this ensures that the rough side will adhere to the rice when you’re ready to eat it).
- Complete a tri-fold over the nori: Fold the left third of the foil down over the nori, then fold the right third over. Be gentle so you don’t fold/tear the nori. Only the foil should be folding.
- Flip the entire foil sheet over so the folded foil seam is now on the back side.
- Place a strip of masking tape vertically down the center of the foil. The tape should be about 1 centimeter longer than the foil, with that extra bit hanging off the top to create a pull tab.
- Flip the foil back over so the nori side is facing up. About two-thirds of the way up the foil, place your onigiri in the center.
- Fold the bottom portion of the foil up and over the onigiri, completely covering it.
- Fold the upper left and right corners of the foil down and inward, wrapping the onigiri into a triangle shape. The extra centimeter of tape should now be visible in the center.
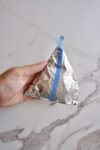
- Flip the wrapped onigiri over. You should now have a neatly packaged onigiri with a pull tab sticking out from the top. When you’re ready to eat, pull the tape tab straight down to tear through the foil, then gently pull the left and right sides of the foil away to unwrap the onigiri. The seaweed will now wrap around the rice!
- Prep Time: 15 minutes
- Cook Time: 20 minutes
Nutrition
- Serving Size: 3 onigiri