
When it comes to quick and delicious meals, shrimp fried rice is a classic favorite. Whether you’re a busy professional, a student, or just someone who loves good food, this shrimp fried rice recipe made in a rice cooker is a game-changer.
Not only does it save time, but it also packs in all the rich flavors you’d expect from a restaurant-quality dish.
By using a rice cooker, you simplify the process without sacrificing flavor. Whether you’re new to cooking or just looking for a convenient way to enjoy a favorite dish, this recipe is sure to become a staple in your kitchen. Give it a try, and enjoy a delicious meal with minimal effort!
Let’s dive into how you can make this delightful meal with just your rice cooker!
What Type of Rice to Use
Choosing the right type of rice can be confusing, especially with so many varieties available. From long-grain basmati to aromatic jasmine rice, each type has its own texture and flavor. In Japanese cooking, however, Japanese short-grain or medium-grain rice is almost always the go-to choice.
Short-grain rice, often labeled as sushi rice, is particularly prized for its soft and chewy texture, which pairs beautifully with traditional Japanese dishes. Medium-grain rice is a great alternative if short-grain isn’t available (I actually almost always use medium-grain myself because it’s generally cheaper where I live!). Both are ideal for recipes like this one, where the rice’s stickiness helps meld the flavors into every bite.

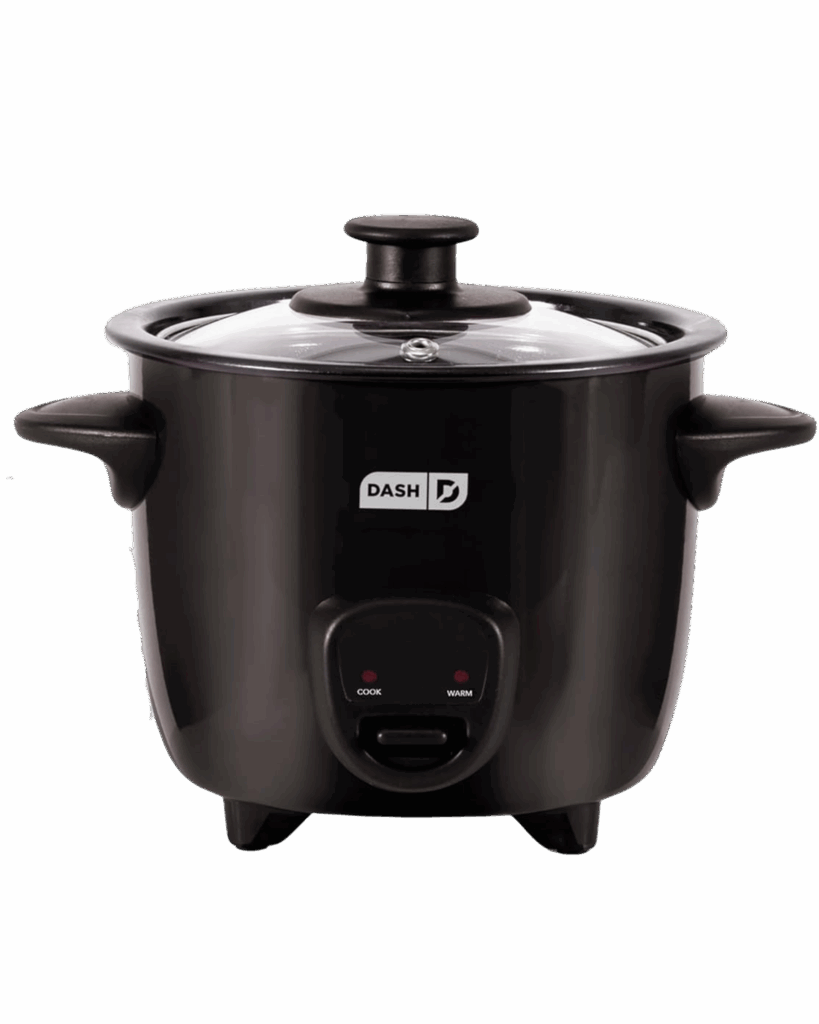
Recommended Rice Cookers
Do I need to have a fancy rice cooker to make this meal? NO! Just like anything, generally, the higher the quality, the better. But you can make my rice cooker meals in a cheap rice cooker, too!
Click the rice cooker photos to see my favorite rice cookers. I included a budget-friendly rice cooker I love! I use the Tiger 5.5-cup model shown. About 1/2 cup of Japanese short- or medium-grain rice makes 1 serving.
Key Features to Look For in a Rice Cooker:
- Steaming Basket or Tray: Allows you to steam vegetables or cook other ingredients while the rice cooks.
- Multiple Cooking Functions: Ensure it has settings for steaming, slow cooking, and possibly even baking.
- Non-Stick Inner Pot: Makes cleaning easier and prevents sticking.
- Timer and Keep Warm Function: Useful for planning meals ahead of time and keeping them warm until you’re ready to eat.

5.5 cups or 10 cups
2 cups

Shrimp Fried Rice in a Rice Cooker
- Total Time: 25 minutes
Description
Shrimp fried rice made in a rice cooker is a quick, one-pot meal that’s flavorful, easy to prepare, and perfect for a satisfying, fuss-free dinner.
Ingredients
- 1 cup rice (I recommend Japanese short-grain or medium grain rice for the most authentic Japanese experience!)
- Water
- 2 tablespoons soy sauce
- 1/2 tablespoon ginger, minced
- 3 cloves of garlic, minced
- 1 cup peas & diced carrots (I use the frozen packaged ones you can get from most grocery stores)
- 1/2 tsp black pepper
- 1/4 tsp salt
- 6–8 shrimp (peeled and deveined), medium-sized
- 1–2 tablespoon gochugaru (adjust according to your spice preference)
- 1 teaspoon toasted sesame oil
- Sliced green onions (for garnish; optional)
Instructions
- Rinse the rice thoroughly and place it in the rice cooker. Add water as you normally would for the rice you are using.
- To the rice cooker, add your soy sauce, ginger, garlic, peas & carrots, and season with black pepper and salt.
- Close the rice cooker lid and cook on the regular white rice setting until the rice is cooked (this takes me ~20-25 minutes, but varies between rice cookers).
- Once done, place your shrimp directly on top of the rice, and sprinkle on the gochugaru. Cook for another 4-6 minutes, or until the shrimp is cooked thoroughly.
- Finally, drizzle with sesame oil and serve, garnished with green onions.
- Prep Time: 5 minutes
- Cook Time: 20 minutes
Nutrition
- Serving Size: 2


The best thing about rice cooker meals is how you can easily add ingredients in the middle of cooking. I added the shrimp right at the end and it turned out perfect!
Woohooo! So glad you loved it, Alina!
The shrimp stayed tender and the rice didn’t clump. Nice to have a one-pot method that actually works.
Hi Isla – so awesome to hear! Thanks 🙂